GenboreeKB exRNA Metadata Tracking System - Navigating the Metadata UI
Overview
- GenboreeKB exRNA Metadata Tracking System - Navigating the Metadata UI
- Step-by-step Instructions to Navigate to the Relevant GenboreeKB
- 1. Login
- 2. Navigate to the Relevant KB
- 3. View General Stats About the Current KB
- 4. Select a Metadata Collection
- Creating a New Metadata Document
- Creating a Valid Document Identifier
- Creating a New Document Through the UI
- Uploading a New Metadata Document
- Finding an Existing Metadata Document
- Using the Search Toolbar
- Querying the Collection
- Viewing a Metadata Document
- Editing a Metadata Document
- Dynamic Retrieval of Bioportal Ontology Terms
- Saving a Metadata Document
- Downloading Metadata Document(s)
- Viewing a Metadata Model
To learn the basics of GenboreeKB, view the documentation found here.
In brief, we use GenboreeKB to store the metadata documents associated with samples present in the exRNA Atlas.
The GenboreeKB UI allows you to view those documents. It also allows you to edit documents, find ontology terms for properties, and
experiment with different documents while assembling your metadata submission for the FTP submission pipeline.
There are three different relevant KBs:
- Public Atlas KB
- Private Atlas KB
- "Testing Ground" Scratch KB
- Members of the public will only be able to access the public Atlas KB.
- Public users cannot write to the public Atlas KB.
- This means that they cannot upload new documents, edit existing documents, etc.
- All they can do is browse (the public Atlas).
- ERCC members can access all three KBs.
- They can write to the private Atlas KB and the "Testing Ground" KB, but they cannot write to the public Atlas KB.
- Only ERCC administrators can write to the public Atlas KB.
- ERCC members should use the "Testing Ground" KB for all scratch work when preparing their metadata documents for submission to the FTP Pipeline.
- This includes searching for ontology terms, checking the validity of a given document, and anything else that comes to mind.
- ERCC members should not use the private Atlas KB for scratch work.
- The only reason to edit documents in the private Atlas is to fix errors and provide updates (users should not upload new documents).
- If a user updates a document in the private Atlas and wants that document uploaded to the public Atlas, he/she should let the DCC admins (Emily) know.
Step-by-step Instructions to Navigate to the Relevant GenboreeKB
In order to better understand the collections you will be browsing, refer to the Wiki page exRNA Metadata Standards.
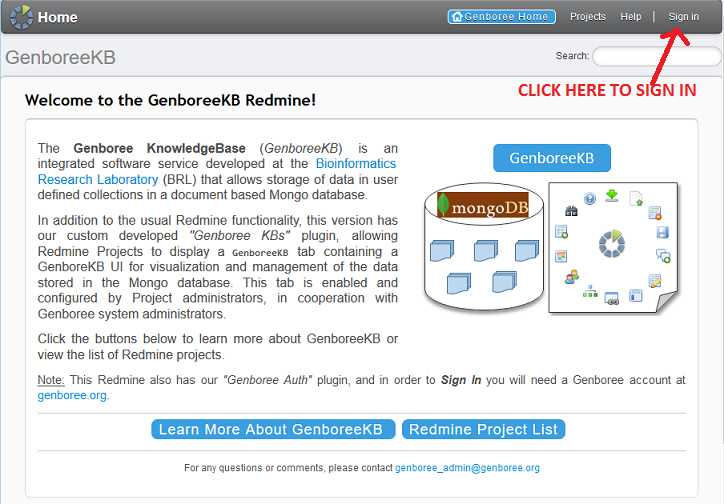
1. Login
- Log in to GenboreeKB using your Genboree user name and password.
- If you are a member of the ERCC, you will be able to access both the public Atlas and private, ERCC-only Atlas.
- In order to get access to the private Atlas KB, you will need to contact Emily after you login for the first time.
- One of us will grant you permission to see the private Atlas KB in your Projects page.
- Non-ERCC members can only access the public Atlas.

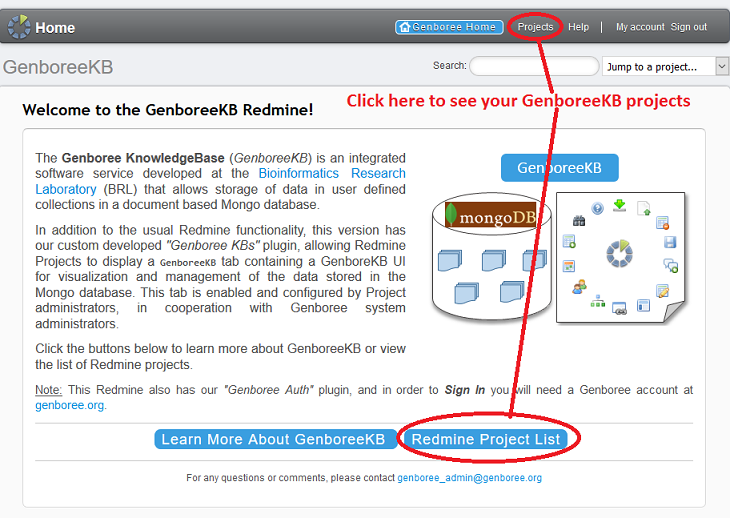
2. Navigate to the Relevant KB
Each Atlas (public and private) has its own GenboreeKB Project.
In order to navigate to the public Atlas, click the 'Extracellular RNA Atlas' project.

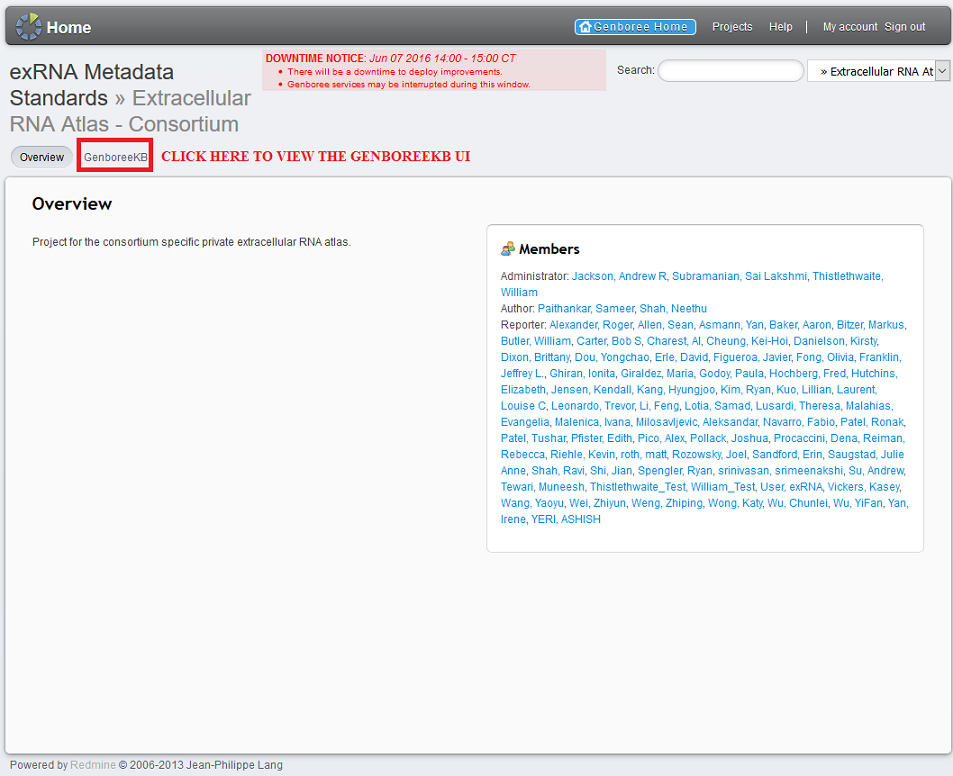
In order to navigate to the private Atlas (if you're an ERCC member), expand the 'exRNA Metadata Standards' project
and select the 'Extracellular RNA Atlas - Consortium' subproject. You can also select the "Testing Ground" Scratch KB
by selecting the 'exRNA Metadata - Templates' subproject.

Regardless of which KB you choose, click the 'GenboreeKB' button at the top of the page to navigate to the GenboreeKB UI.
3. View General Stats About the Current KB
When you enter a given KB, you will see a summary page consisting of several charts and graphs.
These diagrams will contain general statistics about that KB, such as number of docs per collection,
total number of docs over time, and number of doc edits over time.

4. Select a Metadata Collection
At the top of the KB UI, there will be a Collection menu that will allow you to choose between the different collections for that KB.
Each collection has its own unique document model and set of documents.
We can see an example of the available collections for the private Atlas (as of 6/16/16) in the picture below:
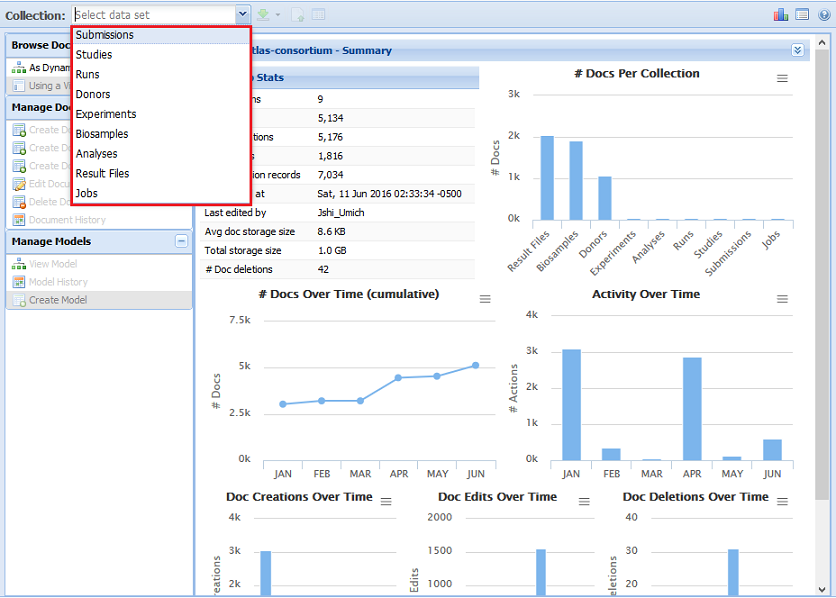
For example, all biosample documents can be found in the Biosamples collection.
After we select a collection (Biosamples, for example), we'll be given statistics on that collection, as seen below:

After you have selected your collection of interest, your next action will depend on what you want to accomplish.
Do you want to browse the existing documents, or edit an existing document, or add a new document?
We will explain how to complete these tasks below.
Creating a New Metadata Document
Once you've selected your metadata collection, you might want to create a new document.
You should only create a new metadata document using the Testing Ground Scratch KB.
You should not create any new metadata documents in the private Atlas or public Atlas.
Each document you create will have its own, unique document identifier (doc ID).
You can either create your own doc ID, following a collection-specific format described below,
or you can allow the GenboreeKB UI to automatically generate your doc ID for you.
If you want to create your own doc ID, follow the directions in the Creating a Valid Document Identifier section.
Please note that if the KB UI automatically generates your doc ID, that ID will not contain your PI ID (a necessary part of any doc ID that goes into the Atlas).
However, the FTP Pipeline will automatically insert this PI ID for you when processing your documents, so the final version that ends up in the private or public Atlas
will contain the PI ID. In other words, don't worry about the fact that your auto-generated doc ID doesn't include your PI ID!
Creating a Valid Document Identifier
If you would prefer to have the GenboreeKB UI automatically generate your doc ID, you can ignore this section.All identifiers must begin with EXR-, regardless of collection.
Then, you should provide your PI ID followed by 6 alphanumeric characters (numbers and capital/lowercase letters).
Your PI ID can be found in a couple of different ways:
- Look at the name of your lab's FTP directory. The last part of the name will be a lowercase version of your PI ID.
- Example: If my FTP directory is "exrna-amilo1", then my PI ID is AMILO1.
- Download the collection of docs found here and find your PI in the list.
- We recommend searching for your PI's last name. It will be associated with the "- PI Last Name" subproperty of a document.
Look at the value of the "ERCC PI Code" root property right above the "- PI Last Name" subproperty.
The middle part of this identifier will be your PI ID. - Example: If my PI's last name is Milosavljevic, I would search for that name. The associated document identifier is EXR-AMILO1-PI,
so my PI ID is AMILO1. - If your PI is missing from the list, please let "Emily know so we can add him/her.
- We recommend searching for your PI's last name. It will be associated with the "- PI Last Name" subproperty of a document.
Finally, you will need to write another dash (-) followed by the collection suffix associated with your collection.
A table containing collection types, suffixes, and example identifiers can be found below:
| Type | Suffix | Example Accession |
|---|---|---|
| Biosample | BS | EXR-KJENS12P3L78-BS |
| Donor | DO | EXR-KJENS12P3L78-DO |
| Experiment | EX | EXR-KJENS12P3L78-EX |
| Analysis | AN | EXR-KJENS12P3L78-AN |
| Submission | SU | EXR-KJENS12P3W78-SU |
| Run | RU | EXR-KJENS12P3W78-RU |
| Study | ST | EXR-KJENS12P3L78-ST |
| File | FL | EXR-KJENS12P3L78-FL |
Your identifier must also be unique - no other document in that collection can have the same identifier.
Creating a New Document Through the UI
There are three different options for creating a new document through the UI. They can be seen below:
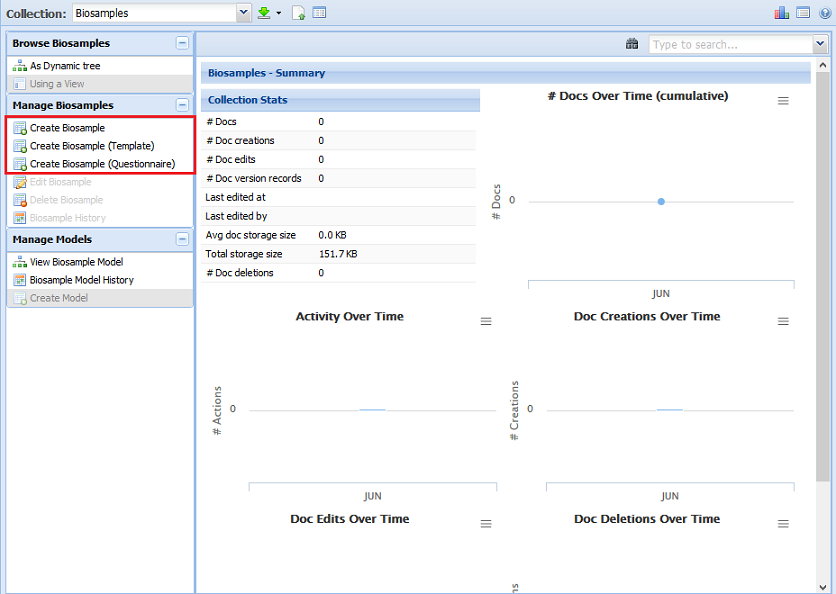
The most basic option is to create your metadata document without a template or questionnaire.
When you select this option, you will be prompted to provide a doc ID.
You can either provide your own doc ID (explained above) or leave the entry box blank and click OK.
If you leave the entry box blank, the doc ID will be automatically generated for you once you save the document.
When you create a document using the most basic option, only required properties will be present in the document initially.
You can always add other, optional properties though!
You can also use a template to create your document (if the collection has templates available).
Select the second option highlighted in the red box above and then choose the template you want to follow.
The template will contain all required properties as well as any recommended optional properties.
Finally, you can use a questionnaire to create your document (if the collection has questionnaires available).
Select the third option highlighted in the red box above and then choose the questionnaire you want to use.
By answering the series of questions presented, you will fill out the required fields in your document.
You will then only have to fill out any optional fields you want to include.
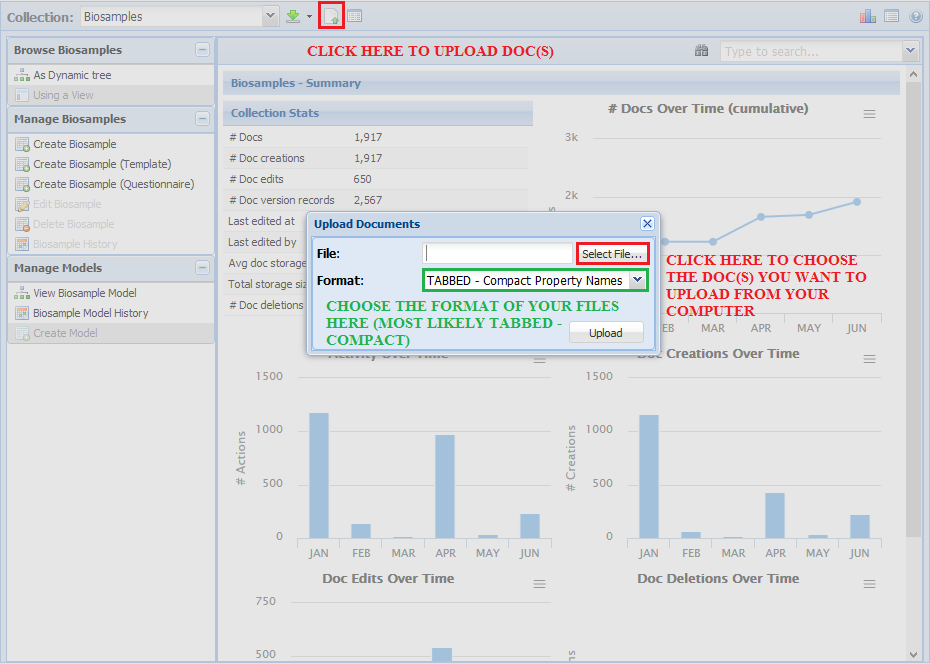
Uploading a New Metadata Document
You don't need to use the UI to create a new metadata document - you can also upload a new, previously-made document.
Click the "Upload Documents" button near the top of the GenboreeKB panel.
You will then find the document you want to upload by clicking "Select File...".
If you are using the templates and other materials provided on this Wiki for creating documents, you should choose
the "TABBED - Compact Property Names" format.
Click "Upload" and then wait until you receive an email informing you that your document was successfully uploaded.
If the document fails validation, you will receive information in your email telling you how to fix your document.
Finding an Existing Metadata Document
If you want to find an existing metadata document (instead of creating a new one),
you can either use the search toolbar in the top right corner of the UI window, or you can
query the collection.
Using the Search Toolbar
The most straight-forward way of finding a document is to use the search toolbar.

If you know the doc ID of the document you're looking for, you can simply type it into
the search bar. You can also type part of the ID, and all matching results will show up.
For example, if I was interested in documents from the PI ID AMILO1, I could type
AMILO1 into the search bar and see a list of documents from AMILO1 in that collection.
Clicking the downward arrow to the right of the search bar will bring up your list of results
in case you search a given term and then click elsewhere, thus minimizing the list.
If the search bar is blank and you click this arrow, a list of random documents will be
displayed. This is useful if you don't know what you want to search for or don't understand
the doc ID format for a particular collection.
Please note that if there are many documents that match your search term, not all will be
listed. Thus, you'll need to use a different search feature (like the query described below)
in order to view a list of all matching documents.
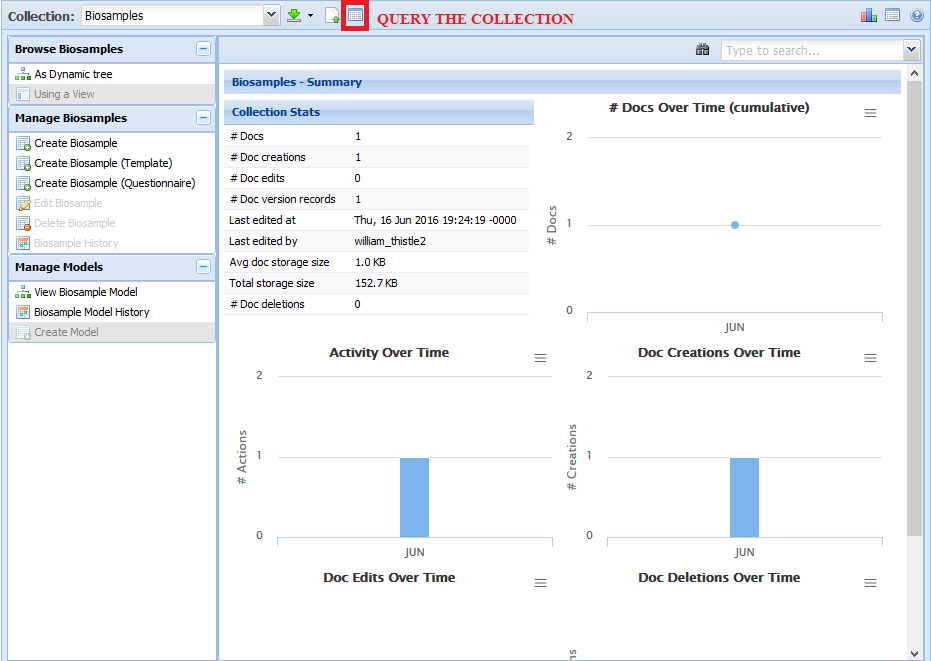
Querying the Collection
Another way of finding a document of interest is using the query functionality found here:
There will be a number of different options in the dialog window:
For the Query option, you can choose between Document ID and Indexed Properties.- Document ID will search for a given term against the doc IDs present in the collection.
- Example: If I wanted to search for AMILO1 in the collection's doc IDs, I would pick this option.
- Indexed Properties will search for a given term in the indexed properties in the collection.
- You can find out which properties are indexed by going to the collection's model and looking at the 'index' column.
- Example: If I wanted to search for "Urine" for the "--- Biofluid Name" property in the Biosamples collection, I would
pick this option. Note that the "--- Biofluid Name" property is indexed.
- Exact means that your search term has to exactly match the value of the property (case sensitive).
- Example: My search term "Urine" would match a property value of "Urine" but not "urine" or "urine and csf".
- Full means that your search term has to fully match the value of the property (case insensitive).
- Example: My search term "Urine" would match a property value of "Urine" and "urine" but not "urine and csf".
- Keyword means that your search term can be anywhere in the value of the property (case insensitive).
- Example: My search term "Urine" would match "Urine", "urine", and "urine and csf".
- Prefix means that your search term will match any property value that begins with your search term (case insensitive).
- Example: My search term "Urine" would match "Urine", "urine", and "urine and csf", but would not match "csf and urine".
- The different views will allow you to view different information in your search results.
- Example: One view might just show me the doc IDs of the docs that contain my search term, while another view
might additionally include biofluid name, disease type, and/or anatomical location.
- Example: One view might just show me the doc IDs of the docs that contain my search term, while another view
For the Term option, you should write your search term.
When you click Submit, you can choose to see your search results in the current tab or in a new tab.
Viewing a Metadata Document
Once you've selected a metadata document, you'll be able to see its contents in the GenboreeKB UI window.
In particular, each document starts off "minimized", with only the root property and its immediate sub-properties displayed.
In order to see all of the sub-properties in a given document, right click on the root property ("Biosample" in the example below)
and click "Fully Expand". You can also right click a sub-property and click "Fully Expand" if you only want to expand that sub-property.
You can also click "Fully Collapse" if you want to minimize a given sub-property (or the doc as a whole).
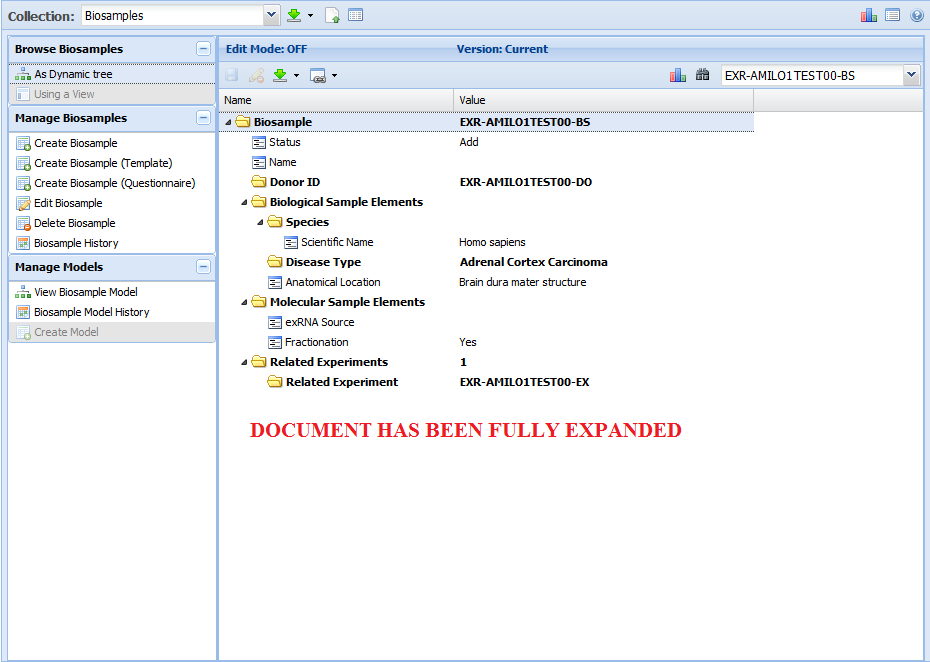
Here, we see a document that has not been fully expanded:
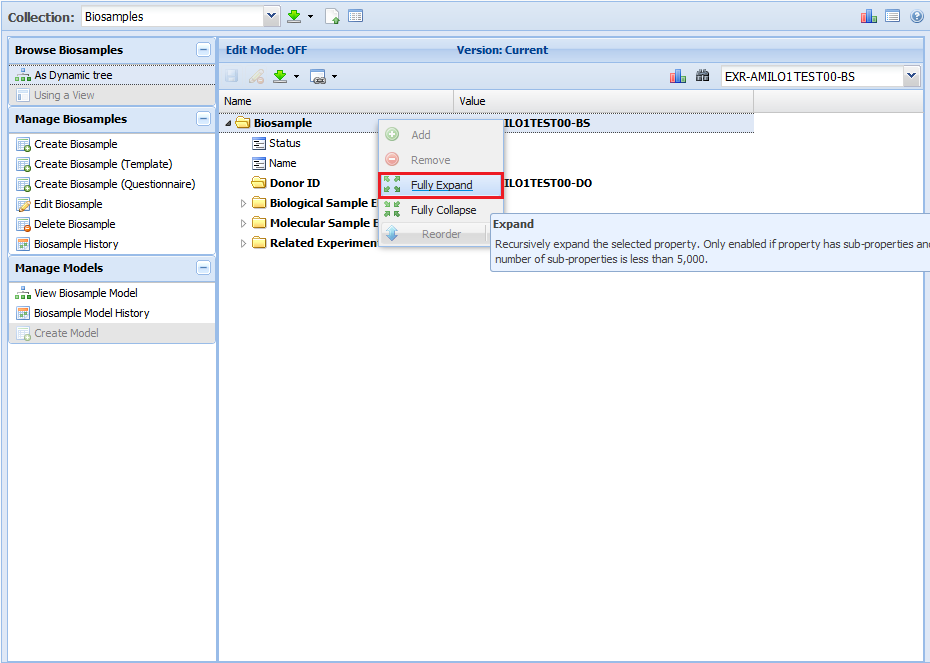
Now, the document has been fully expanded:
Editing a Metadata Document
Now that you're viewing a metadata document, you might want to edit some properties, add new properties, etc.
The first thing you need to do is select the Edit option for the document, shown below:

In order to edit an existing property, all you need to do is double click the value for that property.
The possible values for a property depend upon that property's domain.
For example, if a property has a domain of string, you can pretty much write anything.
If a property has a domain of enum(a, b, c), you will only be able to pick a, b, or c.
Finally, if a property has a domain of bioPortal(...) or bioPortals(...), your value will be enforced by the ontologies listed in the domain.
To learn more about this feature, see the Dynamic Retrieval of Bioportal Ontology Terms section below.
You can view the domain for a given property by viewing the document model.
You can learn more about document models below.
Adding a new property is also easy.
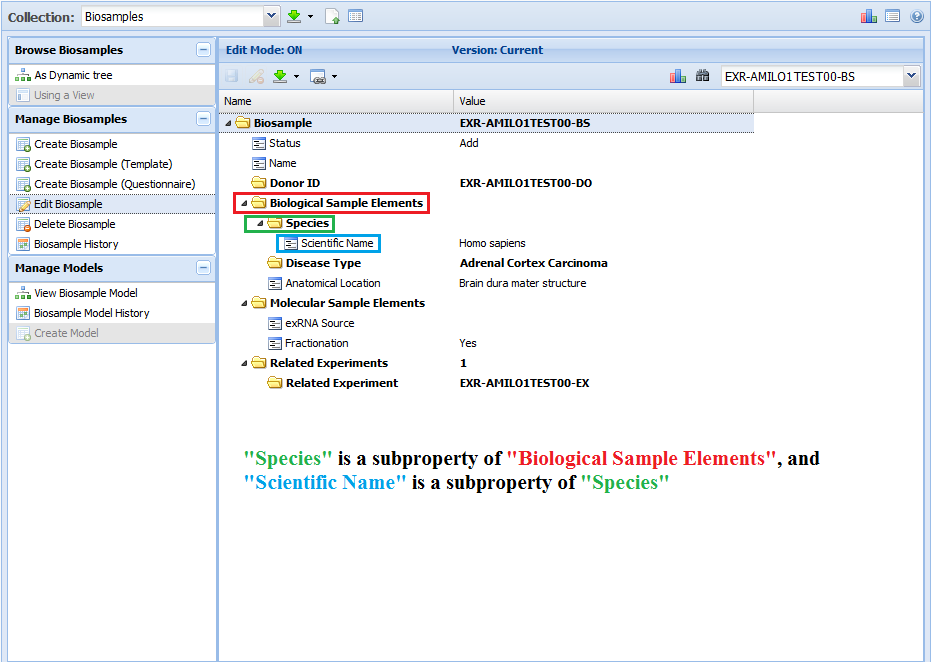
Each property in a given metadata document is a child property (or subproperty) of another, parent property.
The only exception is the root property, which is the document identifier.
For example, in my biosample document, "Species" is a subproperty of "Biological Sample Elements", and "Scientific Name" is a subproperty of "Species".
You can add a new subproperty by right clicking on a given property and then clicking the "Add" button:
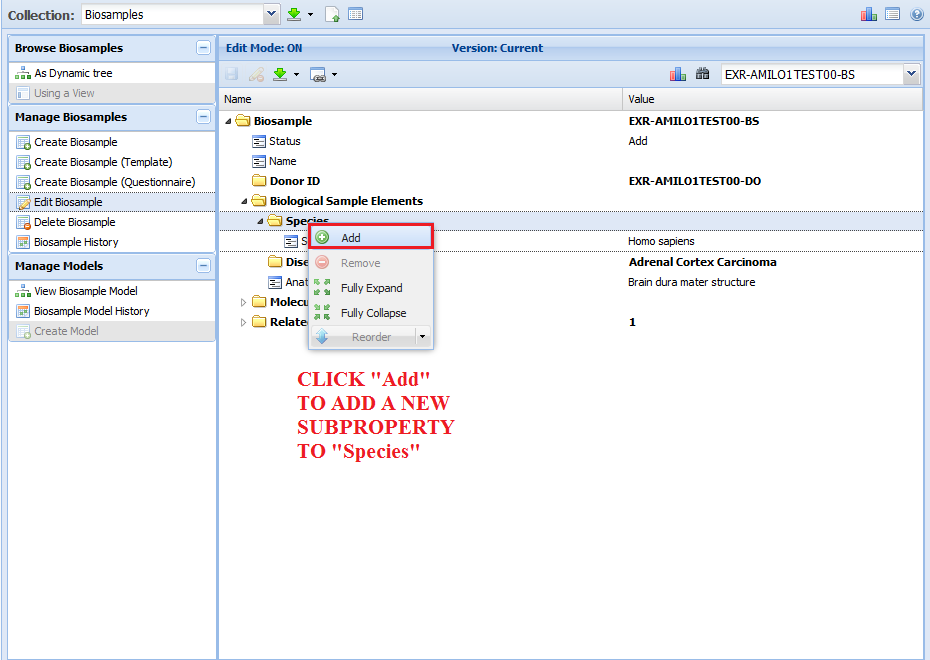
You are then presented with a list of valid subproperties that aren't already present in your document.
Choose the subproperty you want to add (I chose "Common Name") and then click "Update" to add the subproperty.

In order to see all of the different subproperties (so that you can properly build your document), you'll need to look at the document model.
Dynamic Retrieval of Bioportal Ontology Terms
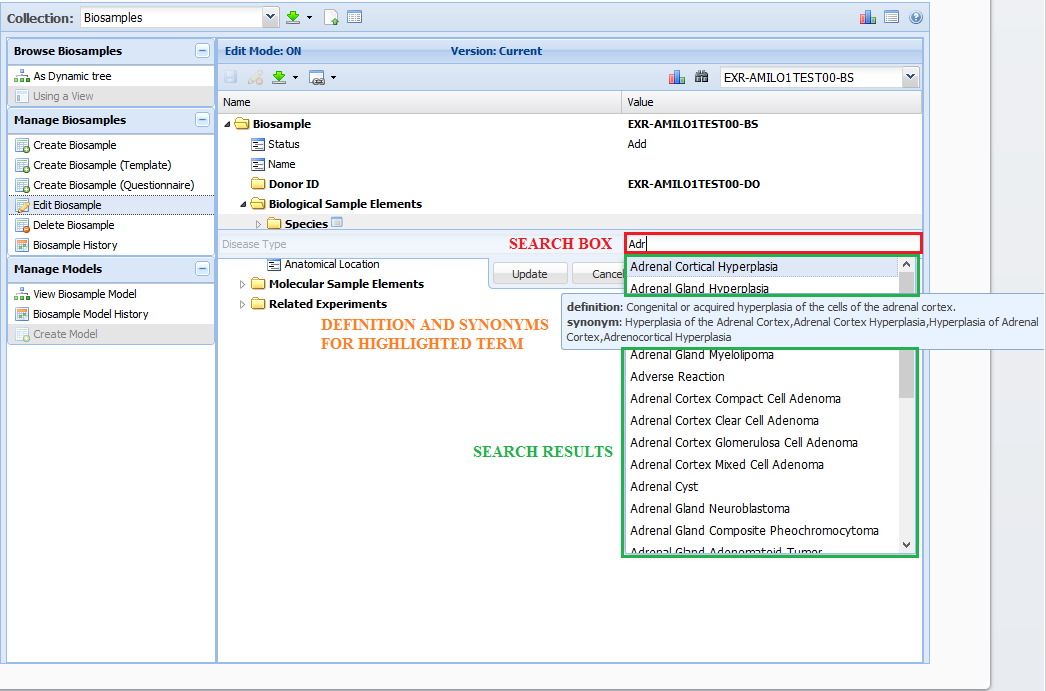
While editing your document(s), you will most likely come across properties with a domain of "bioportalTerm" and/or "bioportalTerms".
These properties use a look ahead search field to dynamically retrieve ontology terms from Bioportal.
The search is performed on both the inputted term as well as synonyms for that term.
When entering a value for these properties, enter at least three characters to begin your search within the ontologies mentioned in the property's domain.
Once you see an appropriate value, select it and then confirm your choice by clicking the "Update" button.
Saving a Metadata Document
Once you're done editing your document, you can save it by clicking the "Save" button in the upper left corner of the GenboreeKB panel.
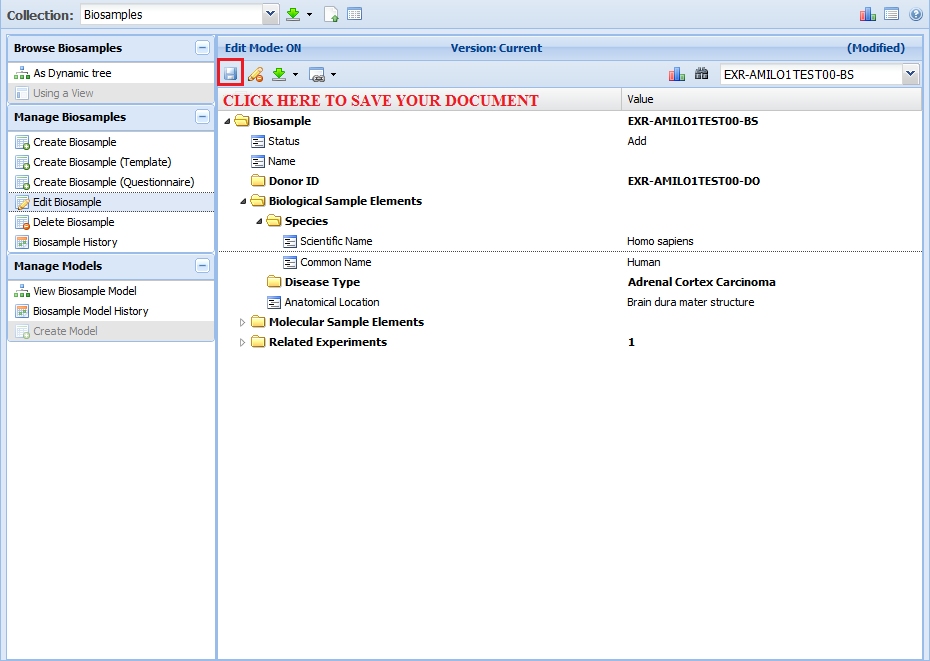
Before we finish saving your document, we will validate it to make sure that all required properties are present and all values are valid.
If you receive an error message when you try to save your document, follow the directions in that error message to correct your document.
Otherwise, if your document is valid, you will receive confirmation that the document was saved successfully.
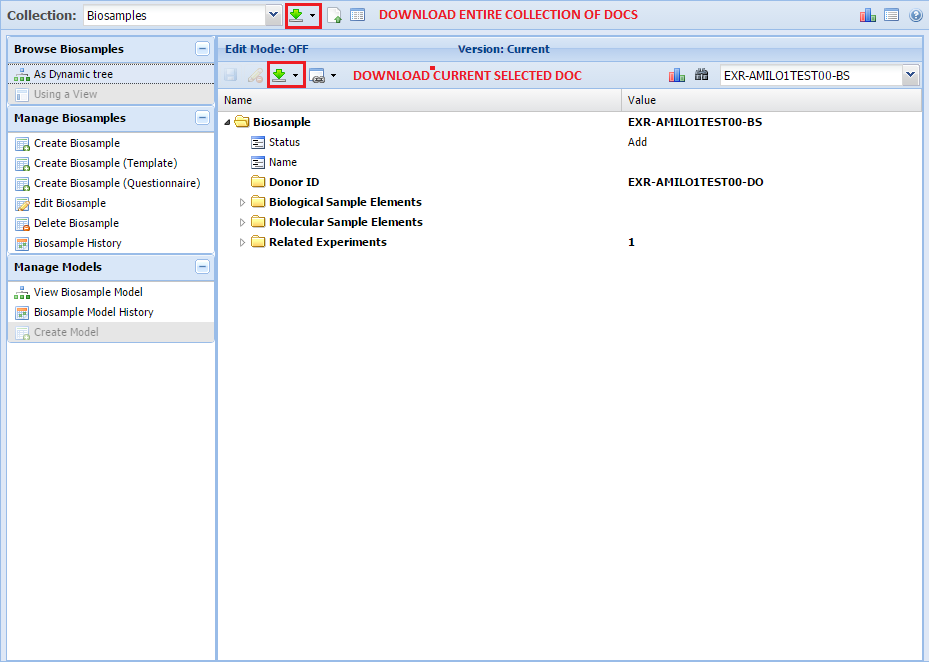
Downloading Metadata Document(s)
There are three different ways to download docs in the GenboreeKB UI.
First, you can download an entire collection of docs at once. For example, if you want to download all of the docs in the Biosamples collection, you would use this option.
Second, you can download a single doc that you've opened in the UI. If you just want to grab one doc (maybe a single Biosample doc), you would use this option.
You can see both of these options in the image below:
After you click either of the buttons, you'll have to select the format in which you'd like to receive your docs.
We recommend "Tabbed - Compact Property Names", since that's the format the FTP Pipeline accepts as valid input.
You could also pick the "Tabbed (Multi) - Compact Property Names" option if you are downloading an entire collection.
Currently, the FTP Pipeline only accepts this format for Biosample docs.
If you'd like to use this format for your own submission to the Atlas, downloading a collection in this format can be instructive for learning what the format looks like.
That way, you can construct your own Biosample submission in the proper way.
The third way to download docs is through the query feature highlighted above.
Simply perform a query and then click the green download icon in the toolbar to download all of the docs that are included in that query.
Viewing a Metadata Model
Each collection has its own document model.
This document model dictates the structure of the documents inside the collection.
Each document must conform to the rules set in the model.
For example, if the model states that a certain property is required, a document will not be valid unless it contains that property.
When we're building documents, the model is valuable because it tells us all of the different possible properties available for a document in the associated collection.
This will help us figure out which properties we need to add to our own document.
In order to see the document model associated with a given collection, click the "View Model" button as indicated below:
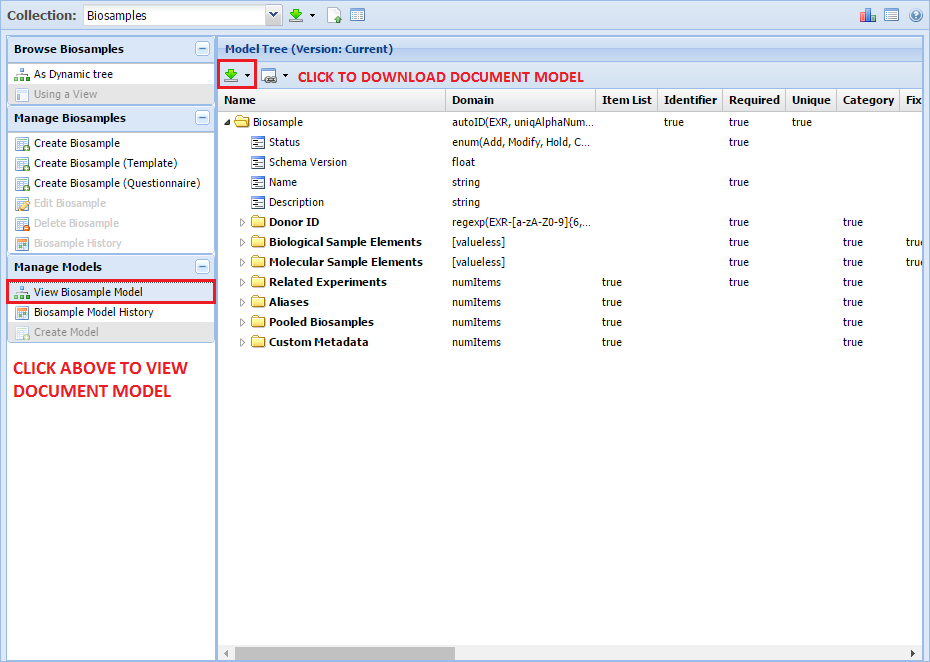
You can download a currently selected document model by clicking the green download icon highlighted in the above picture.
To learn more about what the different columns in the document model represent, you can check out the Data Model Schema page.
To see a full list of the different possible domains in GenboreeKB, click here.
To see a smaller list that contains explanations of some of the less intuitive domains, click here.