| HELP TOPIC: "6. Custom Links" |
Genboree lets you describe custom links for integrating your annotations with other web-sites, databases, and services. This is done through HTTP "GET"-style URLs containing substitution tags which Genboree will automatically fill in.
The general process is:
- Log into Genboree.
- Navigate via the menu to My Databases / Manage Tracks / Link Setup.
- Select the appropriate Group and Database in the droplists.
- Create the custom link.
- Assign the link to one or more tracks.
- NOTE: to manage custom links, you must have at least the Author role in the Group.
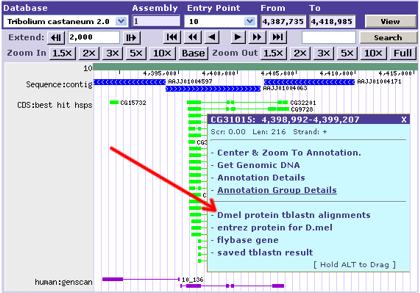
Once you have done this, the custom link(s) will be listed in the annotation's pop-up dialog and any substitution tags will be replaced with the appropriate annotation-specific data:

To manage your custom links, Genboree provides the following functions:
-
Create- Describe the custom link's URL pattern. (details below)
-
Edit- Edit the link definition.
-
Delete- Delete links (entirely).
-
Assign- Assign links to tracks. (details below)
To generate a custom link, you need to:
- Decide on a Name for the link. This is what users will see in the pop-up.
- Construct a URL Pattern. This will be a dynamically-generated URL.
To generate a URL Pattern, you can usually:
- - start with a specific URL that works in your browser
- - identify the parameters the URL needs
- - then replace any parameter values with substitution tags where annotation-specific data will be placed.
Thus, seeing a specific URL such as:
http://genome.ucsc.edu/cgi-bin/hgTracks?position=chr6:2891241-2892562&org=Mouse
We would probably create a URL pattern like this:
Static link (same URL for all annotations):
Simple link (annotation name determines an HTML page name):
Standard link (annotation data used for various parameters):
The following tags are simply replaced by the corresponding data from the annotation. The names correspond very closely to the LFF columns:
- $class
- $name (but see 6.2.5. Special tags)
- $type
- $subtype
- $entrypoint
- $start
- $stop (or $end)
- $strand
- $phase
- $score
- $qstart
- $qstop
- ${"attributeName"} (but see 6.2.4. Regular expression tags)
- $comments (but see 6.2.4. Regular expression tags)
- $sequence
Regular expression tags are used for extracting a specific piece of information from a selected field. The format of a regular expression tag is:
- ${<fieldName>:<regexp>}
- ${<"attributeName">:<regexp>}
- - <fieldName> is one of the fields listed under "6.2.2 Simple tags" above
- - <attributeName> is quoted and refers to a custom attribute in your annotations.
- - <regexp> is a Perl5-syntax regular expression with exactly one (1) sub-group.
For example, the following URL Pattern has a regular expression tag that extracts everything before a version number from the name field for use in the URL:
The following two examples are essentially identical and use custom attributes associated with the annotations to link to a matching region within Genboree itself. Both are placing the annotation's value for that attribute into the link:
If the link it to a Genboree view within the same database, simply use $genboreeRefSeqId. If the link is to a view in another of your databases,
you will need its id value. The easiest way to get this value for your database is to use the "Full URL" menu
item in the graphical Browser; that will also show the general form of a Genboree link. Examples of both of these cases are shown
above.
Special tags cause the annotation data to first be processed in some way before being used in the URL. Currently there is a single such tag:
- $stripName
- - Removes any characters after, and including, the last "." from the annotation's name.
- - Useful for removing version numbers or unique suffices.
- - Equivalent to this regular expression tag: ${name:(.+?)(?:\.[^\.]*)?$}
These tags can be used for links to Genboree pages requiring special parameters. Currently there is a single such tag:
- $genboreeRefSeqId
- - The current database's id number. This value is most often used for the refSeqId parameter.
- - Useful for Genboree Browser links to other locations within the same database.
Each track can be assigned one or more links. These links will show up when the user clicks an annotation in the track (depicted above), and the link URL will be filled in with any annotation data you specified when creating the link.
This also means that a link you create can be used in multiple tracks.
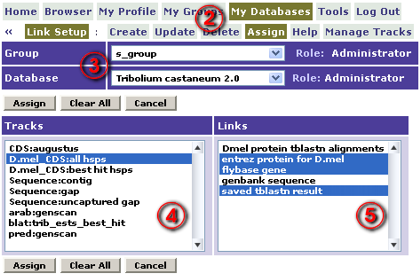
To assign links to a track:
- Log into Genboree.
- Navigate via the menu to My Databases / Manage Tracks / Link Setup / Assign.
- Select the appropriate Group and Database in the droplists.
- Select a track from the list on the left.
- After a brief pause, any links assigned to the track will be highlighted on the right.
- You can change the selections to add or remove assigned links for this track.
- When finished with the selections for the track, click Assign.


|
© 2001-2025 Baylor College of Medicine
Bioinformatics Research Laboratory (400D Jewish Wing, MS:BCM225, 1 Baylor Plaza, Houston, TX 77030) |